Passage Planning: A Practical, Step-by-Step Guide for Second Officers (MarineGuru)
Passage planning is the second officer’s most important navigation task: it turns a voyage order into a safe, efficient route. This guide walks you from receipt of voyage instructions through chart selection and ordering, to detailed planning (pilot points, TSS, routing, weather checks) and gives clear shipboard examples using ECDIS, VHF, NAVTEX and other GMDSS tools.
Quick nav (what you’ll get)
IMO 4-stage process: Appraisal → Planning → Execution → Monitoring
How to find a new port coordinate (Nautical Publications)
ECDIS workflow: create initial route → export → auto-select charts → order & install
Publications to consult: Sailing Directions, Notices to Mariners, Tides, Pilot books, MARPOL guidance
Practical examples: selecting charts, ordering licenses, pilot points, reporting, and weather routing

1. The four stages of passage planning (IMO / good practice)
- Appraisal — gather information (chart coverage, Notices to Mariners, Sailing Directions, weather, tides, routeing measures, company procedures).
- Planning — create initial and detailed route, select charts/ENCs, mark hazards, pilot exchange points, TSS, safe track, contingency plans.
- Execution — handover, brief master/bridge team, set up ECDIS/ARPA/AIS/Radar/Autopilot, maintain comms (VHF, NAVTEX).
- Monitoring & Revision — monitor progress, weather updates, traffic, deviation procedure and log amendments.
Keep this 4-stage sequence in your head — exams and PSCs often refer to “appraisal” and “monitoring.”
2. Appraisal: what to do when you receive the voyage/order
When the chartering office or agent gives you the port/name, do this first (appraisal checklist):
- Identify port position quickly
- Use Nautical Publications (e.g., NUI / NURs / Admiralty List / N to R) or ADMIRALTY List of Radio Signals (ALRS), or digital NPUB/„Ports index“ in ECDIS.
- Example: Use Nautical Almanac / NURs / “Noris”/“Nautical Tables” (the book with coordinates) to get accurate Lat-Long of Port Elizabeth. Note column index (L/C/R) and jot the exact position.
- Open chart catalogue (paper or ECDIS chart catalogue) and see chart coverage between departure and destination.
- Make an initial (rough) route — a simple ocean or deep-water track between major waypoints (not final, but enough to filter charts). Use ECDIS / chartplotter or paper plotting.
- Order charts/ENCs selectively
- Export preliminary route to planning tool (your service provider — e.g., ADMIRALTY Digital, ChartWorld, Navtor, Transas/Seall).
- Use “Select by route / corridor” option (20–25 NM default) so the system auto-selects charts in the corridor. Manually add any extra adjacent charts for diversions.
- Practical note: Many providers use pay-as-you-sail licenses — you can request many charts but only pay for those transited.
- Identify required publications: Sailing Directions (Pilots), Tides, TSS, local pilot manuals, Notices to Mariners, Admiralty List (ALRS), and relevant MARPOL/ship reporting rules.
3. Planning: building the detailed route (step-by-step)
A. From initial route to detailed route
- Import your rough route into planning software/ECDIS.
- Convert rough track into a series of waypoints that respect: charted dangers, traffic separation schemes (TSS), recommended tracks, shallow water limits, underkeel clearance, traffic lanes, and environmental (MARPOL) special areas.
B. Use Sailing Directions (Pilot books) effectively
- Sailing Directions give local knowledge: buoyage, entry channels, pilot boarding points, anchorages, currents, local regulations and VTS frequencies.
- Tip: Don’t search chapter index for the port name — use the diagram index at the chapter start to find the right section (e.g., “Port Elizabeth → chapter 2 → 2.106”).
C. Pilotage, reporting & pilot boarding points
- Mark pilot boarding position and reporting points (ETA, ETA-pilot ready, ETA tug, etc.) on the chart.
- Note mandatory reporting forms and VHF channels (ALRS Vol 6 and port VTS entries).
D. Traffic Separation Schemes (TSS), recommended routes and sensitive areas
- Check Admiralty Sailing Directions and IMO Ship-routing publications for TSS, PSSA and regulated zones. Mark routes and minimum distances from traffic lanes.
E. Weather, sea state, and routing
- Consult meteorological sources: NAVTEX, Inmarsat SafetyNET, company weather routing (WNI, StormGeo), and coastal met service broadcasts.
- Avoid storms/low-pressure systems; plan safe deviation points and escape options (safe havens).
F. Under keel clearance & tidal windows
- Calculate underkeel clearance (UKC) with current, squat and expected shallow banks. Use tide tables and tidal stream atlases and mark optimum tidal windows for restricted navigation.
G. Great circle vs Rhumb line
- For long ocean passages use Great Circle routes (shortest distance). For practical pilotage or mercator charts/rhumb lines may be easier — convert when necessary.
- Tip: choose great circle for long legs; switch to rhumb lines near coastal work and pilotage waters.
H. Environmental restrictions & MARPOL special areas
- Identify special areas (no discharge zones) from MARPOL — mark them on the chart so local operations comply with rules.
4. Publications & tools you must consult (and when to use each)
- Nautical Tables / NURs — quick lat/long for new ports (Appraisal)
- Admiralty Charts / ENC (ECDIS) — primary plotting tool (Planning)
- Sailing Directions / Admiralty Pilots — local knowledge and approach notes (Planning)
- Tide Tables & Current Atlases — UKC, pilotage windows (Planning/Execution)
- Notices to Mariners / List of Lights / ALRS — last-minute changes, light characteristics (Appraisal/Planning)
- NAVTEX / SafetyNET / Inmarsat — meteorology & MSI (Execution/Monitoring)
- Company SMS / POA — company limits, voyage risk assessments (Appraisal)
- Weather routing services (WNI / StormGeo) — for heavy weather routing (Planning/Monitoring)
5. Chart ordering & installation — practical workflow
- Create initial route in ECDIS / chartplotter and export route file (GPX / S57) to planning PC.
- Import route into chart service (e.g., ADMIRALTY e-Nav, Navtor, Transas).
- Auto-select charts by corridor and manually add any extra charts (e.g., alternate anchorages, diversion routes).
- Order chart licenses (6-month or voyage-based) — many providers have pay-as-you-sail.
- Install licenses and charts per vendor instructions (install permit file first, then base and updates). E.g., Furuno, Transas, JRC differ, but sequence is the same.
- Verify charts installed and scale/resolution are suitable for passage legs. Keep backups.
6. Final route preparation (the “planning stage”)
- Replace rough waypoints with navigable tracks avoiding dangers and conforming with local rules.
- For each waypoint include: Lat/Long, ETA, intended course, speed, contingency action and watch handover notes.
- Mark all navigational hazards, TSS, pilot boarding, anchorage, reporting points, and MARPOL zones.
- Prepare a passage plan document: route chart, list of waypoints, pilot card, comms plan (VHF channels: Ch16, pilot VHF, VTS), and essential pubs.
7. Comms & equipment you’ll use during planning & execution (modern bridge toolkit)
- ECDIS / Chartplotter — route plotting / ENC (Primary planning tool)
- GPS / GNSS — position source for waypoints and auto-position update (Inmarsat/DSC position feeding)
- Radar & ARPA — target detection in coastal/traffic waters (Execution)
- AIS — identify traffic, target CPA/TCPA (Execution)
- VHF (Ch16 & working channels) — calling/coordinating with other ships and VTS (Execution)
- NAVTEX receiver — automated MSI (Monitoring)
- Inmarsat-C / Fleet / HF — long-range comms, weather and GMDSS messages (Monitoring & contingency)
- Paper charts and Pilots — mandatory backup to ECDIS, especially in restricted waters
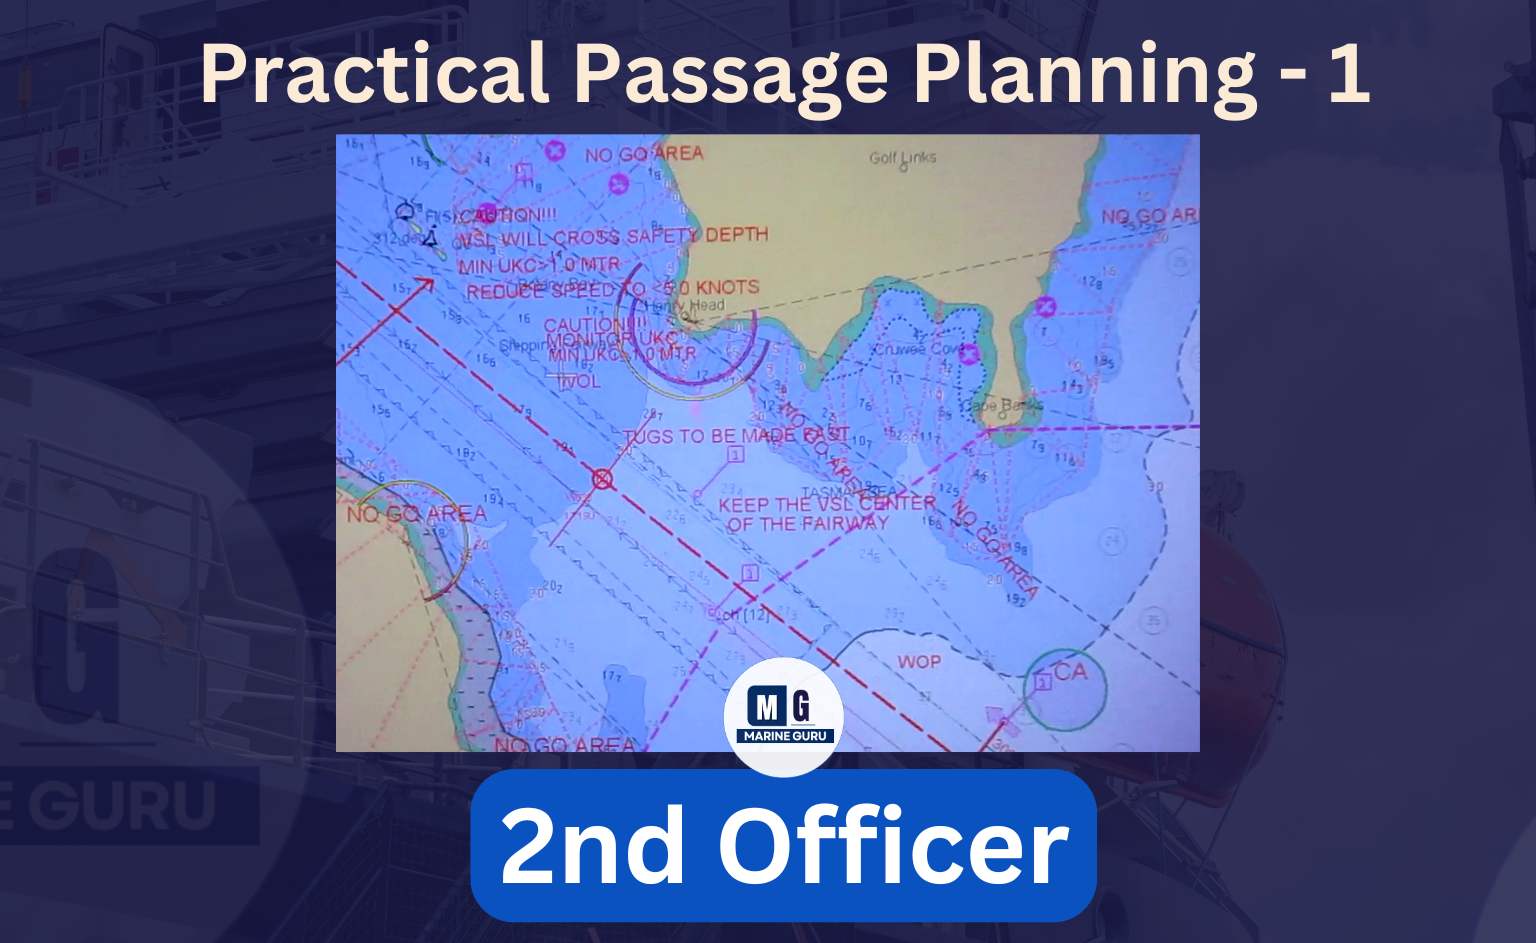
8. Practical, step-by-step example — Spain (La Coruña) → Port Elizabeth (South Africa)
(Condensed walk-through from your vlog example)
- Appraisal: Charter gives “Port Elizabeth”. Use Nautical Tables to find coordinates (center column). Note Lat/Lon.
- Initial route: Draw a great-circle / deep-water route on ECDIS from La Coruña → Port Elizabeth. Export route file.
- Chart selection: Import route to planning software. Use 20–25 NM corridor selection; add adjacent charts for diversion (pay-as-you-sail helps).
- Order & install: Request chart licenses (6 months). Install permits and base charts when received.
- Detailed planning: Open Sailing Directions to Port Elizabeth: find chapter by index diagram, read Section 2.106 for local approach, pilotage, range lights, pilot boarding points and tidal windows. Mark pilot boarding position and ETA for pilot request.
- Checks & publications: Mark TSS, sensitive areas (MARPOL), local VTS channels (ALRS Vol 6), NAVTEX station coverage (ALRS Vol 3), and plan for weather via company routing.
- Execution setup: Brief Master and bridge team, set up ECDIS route with alarms, ensure GPS feeding, set radar ARPA targets and AIS display, set VHF watch protocols.
- Monitoring: Monitor NAVTEX weather & SafetyNET, receive updated routing, adjust ETA and inform agents/pilot station.
Passage-planning practical checklist
Before you start
- Route order & voyage instructions received (port, cargo, ETAs)
- Company risk assessment / SMS checked
- Initial port coordinates (NURs / Admiralty / ECDIS) noted
Appraisal
- Chart catalogue consulted & initial route created
- Sailing Directions & local pilot volumes identified
- Weather sources & NAVTEX / SafetyNET stations identified
- Tides & currents planned (tide tables obtained)
Planning
- Detailed waypoints with lat/long, ETA, course, speed
- TSS, reporting points and pilot boarding positions marked
- Under-keel clearance & squat calculated
- MARPOL special areas & PSSA marked
Charting
- ENCs / paper charts ordered (corridor + diversions)
- Licenses installed and verified
- Paper chart folios & corrections up-to-date (NtM applied)
Execution
- Master briefed & passage plan signed off
- Bridge equipment configured (ECDIS, Radar, AIS, GPS)
- VHF watch & comms plan set (Ch16, pilot VHF, VTS)
- Emergency contingencies noted
Monitoring
- NAVTEX/SafetyNET on & check schedule
- Weather updates monitored & action plan ready
- Passage logbook for deviations / events ready
Common pitfalls & how to avoid them
- Ordering every chart — expensive and unnecessary. Use route corridor + diversion charts.
- Relying solely on ECDIS — always keep paper backup and pilot book extracts.
- Neglecting MARPOL / local regs — fines and delays; always check special areas.
- Not briefing Master/Bridge properly — always hand over a printed route & highlight contingencies.
- Forget to install chart permits — downtime in port; install permits as soon as received.
Video Credit : Sailor Stories
FAQs
Q: What are the four stages of passage planning?
A: Appraisal, Planning, Execution, Monitoring.
Q: How do I quickly get the coordinates of a new port?
A: Use Nautical Tables / NURs / Admiralty index or the port index in ECDIS to find the exact Lat/Long.
Q: How do I select which charts to order?
A: Create an initial route, import to chart service, use corridor selection (20–25 NM), then manually add adjacent charts for diversion coverage. Use pay-as-you-sail if available.
Q: Should I use great circle or rhumb line?
A: Use great circle for long ocean legs (shortest distance) and switch to rhumb lines or detailed coastal routing near shores and pilotage.
Q: What publications are essential for planning?
A: Sailing Directions (Pilots), Admiralty Charts/ENCs, Notices to Mariners, Tide Tables, ALRS (for VTS/pilot frequencies), NAVTEX/SafetyNET sources and local pilot guides.